
When processing different models of rubber housings, the automatic housing insertion machine requires material replacement. The entire process can be summarized as: Removing Old Materials → Installing New Materials → Adjustment → Testing. The specific operation steps are as follows:
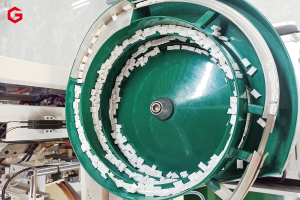 Step 1: Preparation
- Machine Shutdown and Power Off: Switch the machine to “Manual” or “Setting” mode, then fully stop the machine. Most importantly, turn off the main power supply.
- Work Area Cleaning: Clean debris, dust, or residual rubber housings around the vibratory bowl, feeding track, and mold to ensure the work area is clean.
- Prepare New Rubber Housings: Check whether the model and specification of the new rubber housings match the production requirements, and place them near the operation table.
- Prepare Tools: Usually, hexagon wrenches, screwdrivers, etc., are required (specific tools depend on the machine model) for disassembly and adjustment.
Step 2: Remove Old Materials
- Empty the Vibratory Bowl: Take out the remaining old rubber housings from the vibratory bowl and put them back into the raw material box.
- Remove Residual Material Tapes: Starting from the outlet of the vibratory bowl, carefully take out the remaining rubber housings and material tapes along the feeding track. If the material tape is stuck, do not pull it forcefully; instead, find the stuck point and release it carefully.
- Track Disassembly (Optional): If the feeding track needs thorough cleaning or a track of different width needs to be replaced, use tools to loosen the fixing screws and remove the track.
Step 3: Install New Materials
- Put New Rubber Housings into the Vibratory Bowl: Pour the new rubber housings neatly into the vibratory bowl. Note that the housings should not exceed the maximum capacity line of the vibratory bowl to avoid affecting feeding efficiency.
- Thread the Material Tape into the Track:
- Start from the outlet of the vibratory bowl and lay the material tape along the designed track path.
- Ensure the direction of the rubber housings is correct (this is the most critical step!). Generally, rubber housings have male/female ends, buckles, or guide grooves, which must match the direction of the track and subsequent crimping mold. If unsure, refer to the drawing or sample.
- Continue threading the material tape through the entire track until the rubber housing at the front end reaches the end of the track, ready to enter the crimping mold.
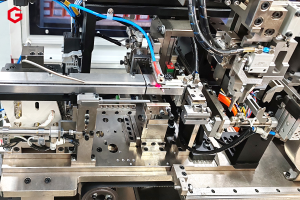
Step 4: Adjustment and Setting
- Adjust the Vibratory Bowl: According to the weight and size of the new rubber housings, it may be necessary to fine-tune the amplitude and frequency knobs of the vibratory bowl to ensure smooth and stable feeding without material jamming or flying.
- Adjust the Feeding Track: If the width or thickness of the replaced rubber housings changes, adjust the width of the track to match the rubber housings—it should not be too tight (which may cause jamming) or too loose (which may cause flipping or misalignment).
- Adjust the Stopper and Positioner: Check and adjust the stopper and positioning device at the end of the track to ensure the rubber housings can be accurately delivered to the center of the crimping mold.
- Set the Crimping Position (If Needed): If the change in the length or shape of the rubber housings causes a change in the crimping position, it may be necessary to fine-tune the stroke or position of the crimping mold in the machine program.
Step 5: Testing and Verification
-
Manual Mode Testing:
- Do not power on first! Manually rotate the machine flywheel (if supported) to check for interference or jamming when the rubber housings are fed into the mold.
- Restore power supply, switch to manual mode, and run the machine step by step:
- Jog the vibratory bowl to observe if feeding is smooth.
- Jog the feeding mechanism to observe if a single rubber housing can be accurately fed into the crimping station.
- Perform a complete crimping cycle (without wires) to observe if the rubber housing is accurately positioned in the mold.
-
No-Load Operation Testing: In manual mode, let the machine run continuously for several cycles without putting in terminal wires. Observe whether the entire feeding and positioning process is stable and reliable.
-
Loaded Testing: Put in wires and conduct actual crimping tests. Check the crimped finished products as follows:
- Listen to the sound: Check for abnormal impact noise.
- Check the appearance: Check if the rubber housing is crushed, cracked, or misaligned.
- Test the function: Use a tension meter to test if the pull force is qualified, and use a projector to check if the terminal and rubber housing fit properly.